
Nifty Attributes
Version 3.2 is now available. This fixes a problem with Inventor 2023.3 where when running the command, the dialog would appear and then quickly disappear. It also fixes a problem where if you had installed DeveloperTools from the Inventor SDK, Nifty Attributes would not install. I’ve also added a couple of enhancements (Copy and purge attribute sets, and fixed a couple of problems).
Many of you are familiar with the Attribute Helper add-in that I wrote many years ago to help with some programs I was writing that used attributes. Autodesk is now including it as one of the programs delivered with the Developer Tools installer in the SDK that’s installed when you install Inventor. I’ve been working on some programs recently that heavily use attributes and encountered a couple of bugs in my old version and also wished I had a couple of additional features. I went ahead and upgraded the program and to differentiate it from the other one still being delivered have changed the name to “Nifty Attributes”.
To download the installer, click the button below.
Introduction
Working with attributes can sometimes be a bit frustrating because the only access you have to attributes is through the API. You can’t quickly create, edit, or view an attribute without writing a program to do it. Because of this, I was frustrated when working on my first program that made extensive use of attributes. For the program to function correctly the attributes it was using all had to be correct and it was difficult to debug problems to determine if the problem was my program or the attributes it was trying to access.
For my own sanity I wrote a little utility that would let me view all of the attributes in a document. That helped a lot but I never felt it was finished because it only allowed me to view existing attributes and I still couldn’t easily create or edit an existing attribute without writing code. This app is my solution to that.
The app is an add-in and to use it download and install it using the button below. If Inventor is running, you’ll need to restart it to allow Inventor to refresh it’s available add-in list. When installed, the Nifty Attributes command is added to the Tools tab, in the Part, Assembly, Drawing, Presentation, and iFeatures ribbons, as shown below.

Running the Nifty Attributes command displays the dialog below.
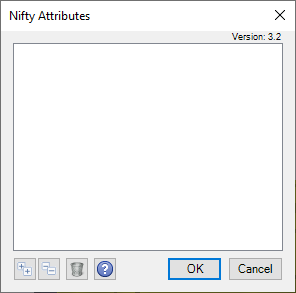
The dialog lists all the entities that have any attributes associated with them. In the example above there aren’t any attributes in the part so the dialog is empty.
Adding and Editing Attributes
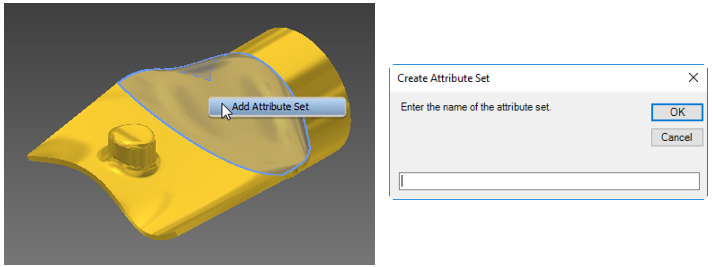
You can use the Nifty Attributes utility to add an attribute set to any entity that supports attributes. To add an attribute, run the Nifty Attributes command, and while the Nifty Attributes dialog is displayed, select and right-click the entity you want to add the attribute set to. The context menu shown in the picture below will be displayed. You can select an entity in the graphics window or the browser. In the example below, a face was selected and right-clicked to display the context menu to access the Add Attribute Set command. Running the Add Attribute Set command displays the dialog below, where you can specify the attribute set’s name.
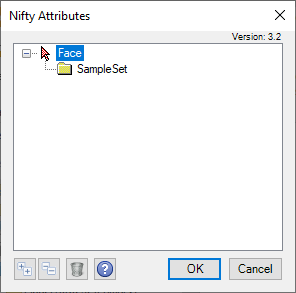
Once the attribute set is added, the dialog is updated to show the entity and the associated attribute set, as shown below. Clicking on the entity (“Face” in this case) will highlight the associated entity in the graphics window.
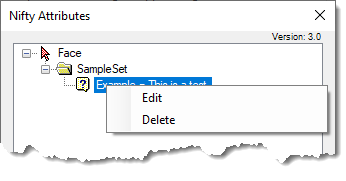
You can add an attribute, edit the name, delete, or copy the attributes of an attribute set using the context menu on the attribute set node, as shown below.

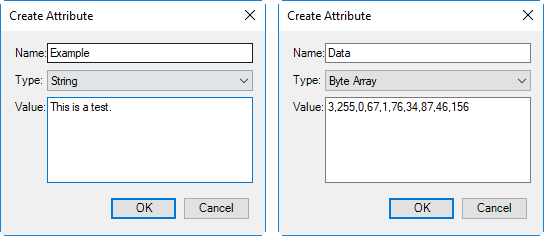
When you create an attribute, the dialog below displays where you specify the name, type, and value. The value of a “Byte Array” type of attribute is set using the syntax shown below; comma-delimited numbers where the values can be any number from 0 to 255.
To edit an attribute, you can double-click the node or use the context menu to edit or delete the attribute.
For string types of attributes, the add-in checks to see if the value is an XML or JSON formatted string, and if it is, an additional “View Formatted” button is displayed, as shown below. Clicking this button will open another dialog and display the data in a formatted display, as shown on the right. The formatted display is only for viewing; editing is only supported in the “Create Attribute” dialog.

Finding Attributes
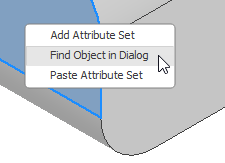
All the attributes in the document are displayed in the dialog when you run the Nifty Attributes command. However, if you’re writing a program that extensively uses attributes, matching the item in the list with the entity in the graphics window can be challenging. Clicking on a node in the list will highlight the corresponding entity in the graphics window, but that can be tedious if the list is large. Instead, you can use the “Find Object in Dialog” functionality available in the context menu of the entity. Select and right-click on any entity in the graphics window or browser. If that entity has attributes associated with it, the “Find Object in Dialog” option will be shown in the context menu, as illustrated below. Selecting that option will select the entity in the dialog, allowing you to find it quickly.
Context
When you run the Nifty Attributes command, it displays all the attributes in the active document. For example, if you run it with an assembly open, it will display the attributes that exist directly in the assembly. It will not display attributes that might exist in any of the sub-assemblies or parts in the assembly. To see the attributes in those documents, you can in-place activate the part or assembly so it’s the active document and then rerun Nifty Attributes. Nifty Attributes considers the activated document and will display the attributes in the active part or assembly.
If the top-level assembly is active and you select an entity in a sub-assembly. For example, if you select a face of a part and add an attribute, that attribute will be on the proxy of the face and will only exist in the top-level assembly. The ability to add attributes to proxies or the native object is powerful. Still, you need to know which document is active when creating attributes because that’s where the attribute information will be saved.
Copying Attributes
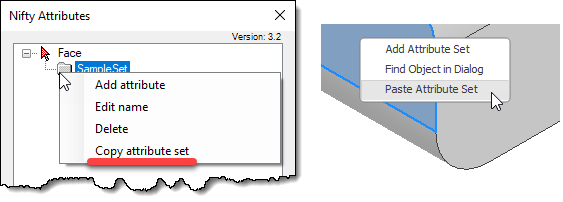
You can copy an attribute set from one entity to another. To do this, run the Nifty Attributes command and find the attribute set you want to copy. Right-click on the attribute set node and select the “Copy attribute set” option in the context menu. Next, select and right-click on the entity you want to copy the attribute set to, either in the tree in the Nifty Attributes dialog or the graphics window, and select the “Paste Attribute Set” command, as shown in the picture below. Pasting will copy the attribute set and its child attributes to the new entity. The attribute set and the attributes are new and independent of the original attribute set. You can now modify the copied attribute set in any way without affecting the original attribute set.
Purging Attribute Sets
Attribute sets and attributes are never automatically deleted. For example, if you create an attribute set on a sketch line and then delete that line, the attribute set will still exist. An orphan attribute set is illustrated below, where the sketch line exists on the left but has been deleted on the right. The attribute set still exists, but its parent entity is now “Nothing”.
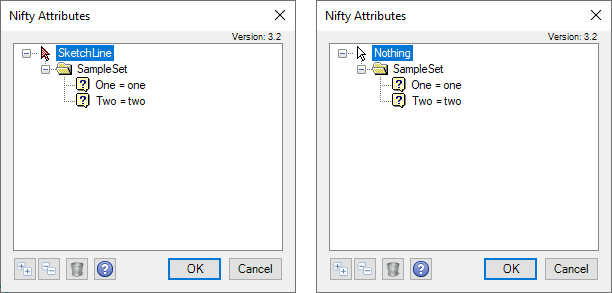
The reason Inventor doesn’t automatically delete attribute sets is that the lifetime of some entities is unknown. For example, if you add an attribute to an edge and then fillet the edge, you’ll see the same behavior. However, you can easily get the edge back by deleting or suppressing the fillet feature or repositing the “End of Part” node to where the edge exists. When you rerun the Nifty Attributes command, it will show that attribute associated with the edge.
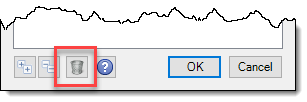
Even though some entities can come back, as described above, deleting all orphaned attribute sets is sometimes desirable. You can do this by manually deleting the attribute sets associated with a “Nothing” entity, but there is a “Purge Orphanced Attribute Sets” command at the bottom of the dialog, as highlighted below, that makes the process much easier. Running that command will delete all orphaned attribute sets.
Other Features
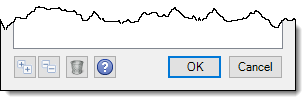
The buttons along the bottom of the Nifty Attributes dialog will expand or collapse all of the nodes in the tree. The help button will display a PDF file with the same content as this page. The last icon will open a web browser to a PayPal donation page. Nifty Attributes is a completely free program to use. However, if you find it useful and it saves you a lot of time and headache I would appreciate a little donation to partially cover the work that goes into it.
The program is compatible with Inventor 2020 and later.
To download the installer, click the button below.