
Description
What is a Dogbone?
Dogbones are typically used as a workaround to a problem resulting from cutting material using a mill or router. Because you’re cutting something using a spinning cutter, the resulting cut always has round internal corners. This is illustrated in the workflow below. First is a simple example of an assembly where two parts are meant to fit together.
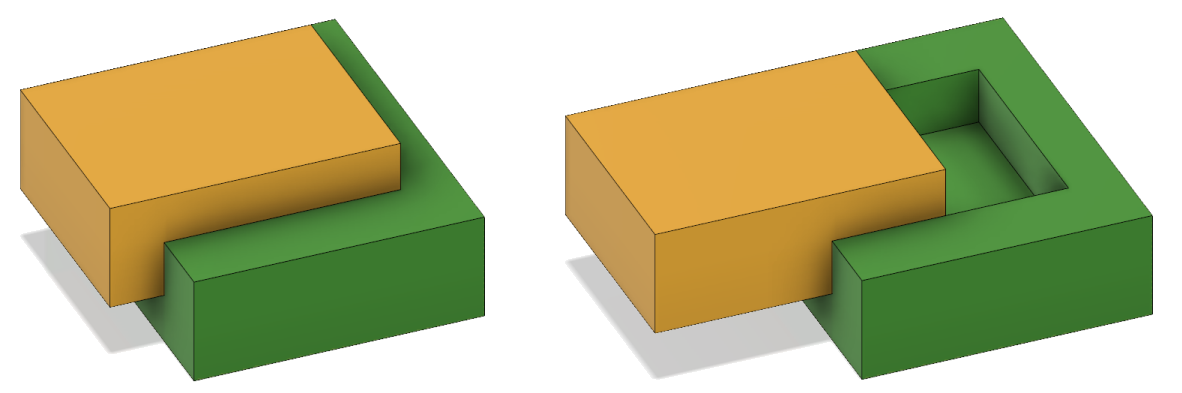
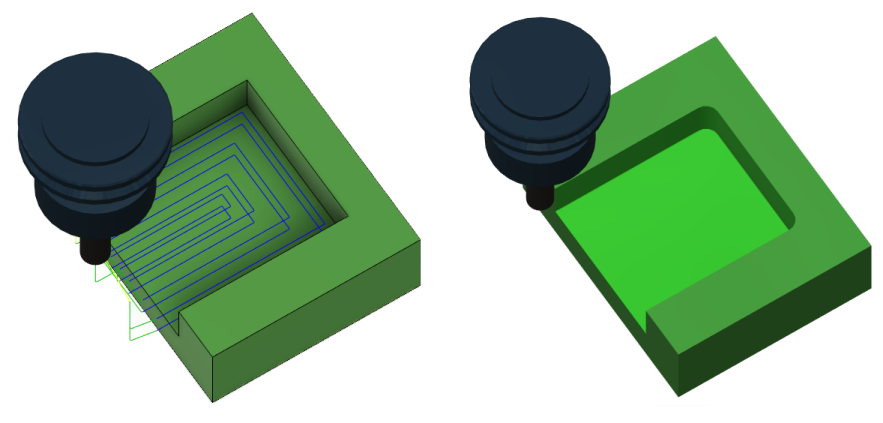
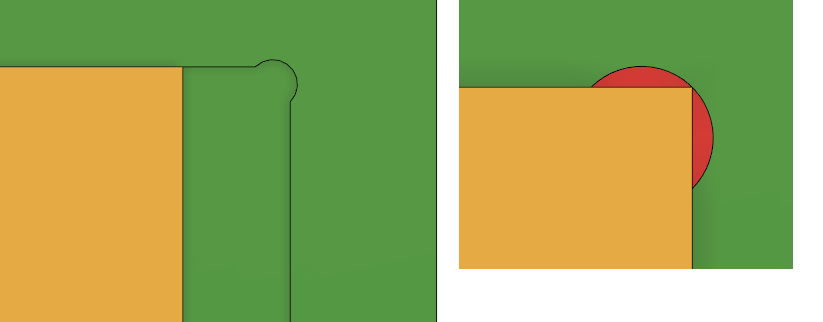
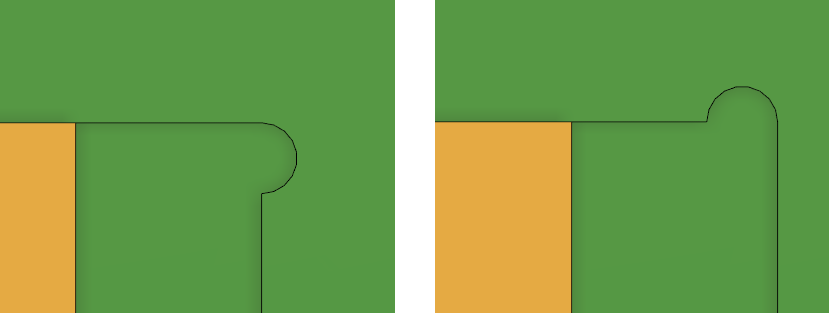
Below, on the left, is the toolpath to cut the cavity where the yellow part will fit. Notice that the toolpath has sharp corners. On the right is the simulation of the machined result. The internal corners are rounded because the tool is round.
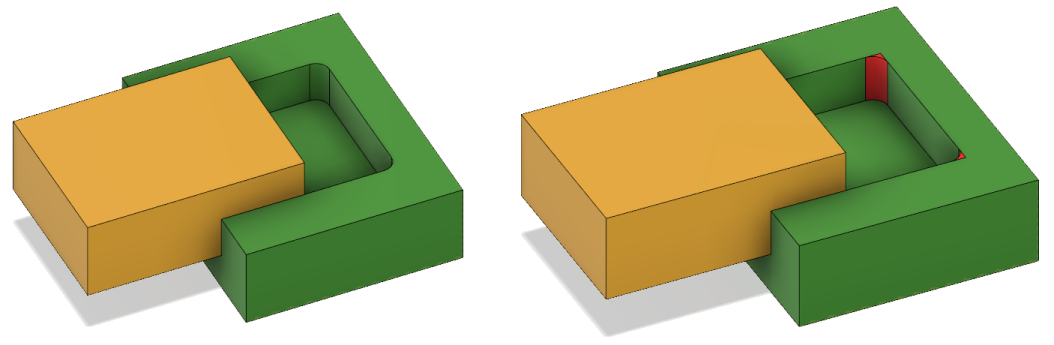
Because of the rounded corners, the yellow part no longer fits into the green part because of the interference highlighted as red in the picture below on the right.
There are two ways to solve this problem. One is to manually remove the rounded corner, typically with a chisel. However, if you’re using CNC to automate the cutting of an object, you probably don’t want to have to perform a lot of additional manual work to finish the part. The other option is removing more material in the CNC process to clear the corner. The extra machining performed to remove this material is commonly referred to as a “dogbone” because, in some cases, it can resemble the shape of a bone you would feed to a dog. The Nifty Dogbones add-in supports the creation of several dogbones shapes, described below.
Installing the Add-In
You can install a free 60-day trial version of the software. The trial has all of the capabilities but will stop working after the 60-day trial period is finished. If you want to continue using it after the trial period, you must purchase a license. The add-in can be installed here:
WINDOWS INSTALL
Once the installer for Windows has been downloaded, run the installer exe to install the add-in. You’ll need to restart Fusion 360 so it can find the add-in and add the buttons to the user interface.
MAC INSTALL
Once the installer for Mac has been downloaded, you’ll need to run the .pkg file. You can right-click and choose “Open” to get around the security. You’ll be guided through the installation process. If Fusion 360 is running, you’ll need to restart it so it can find the add-in and add the buttons to the user interface.
Purchasing a License
You can purchase a license at any time. For Nifty Dogbone for Fusion 360, you purchase a perpetual license, which means it’s a one-time purchase that allows you to continue running the software without any time limits. You’ll also have access to updates and support as part of that purchase. It is not a subscription you have to renew after a certain period of time but a license to use the add-in with no time limits.
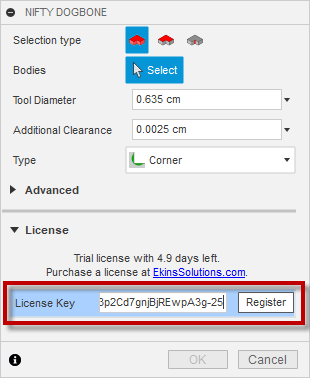
When you purchase a license, you’ll be provided a license key. To enable the add-in, you can copy and paste the provided license key into the command dialog and click the “Register” button. The license of Nifty Dogbone for Fusion 360 will then be activated for your Autodesk account, and the add-in will function on any machine where you’re logged into your account. However, you must manually install the add-in on each machine, but the licensing process only needs to be done once.
Using the Add-In
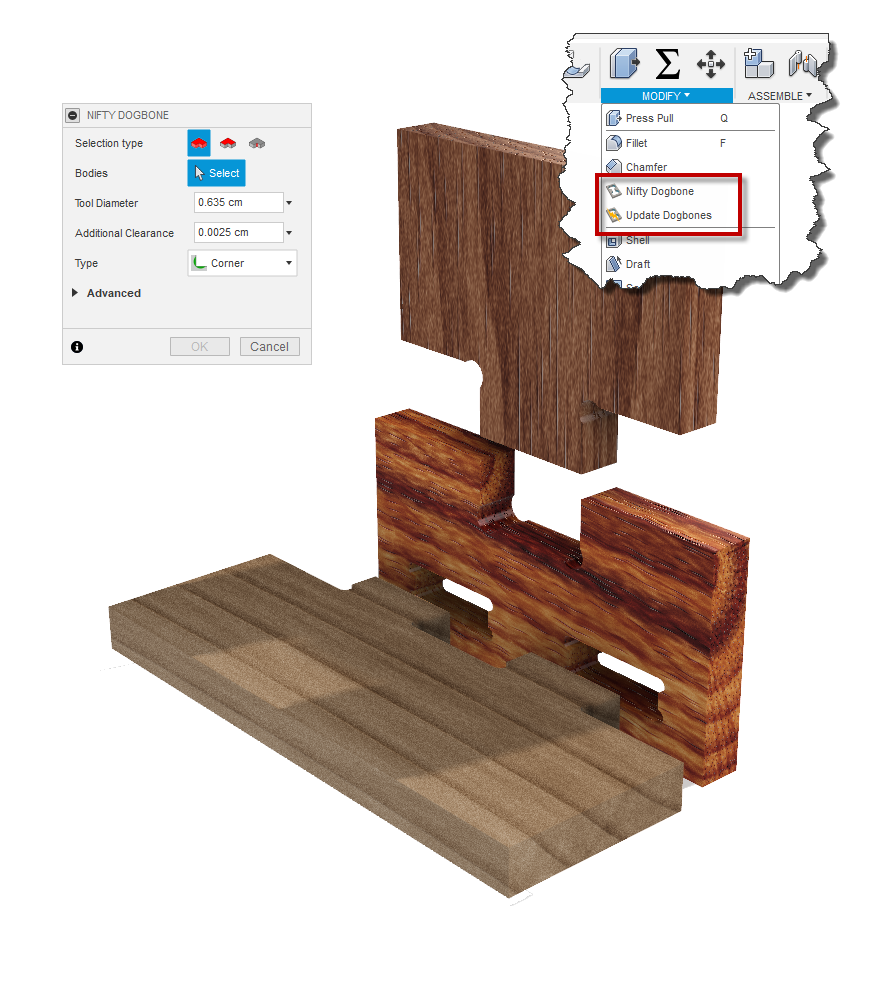
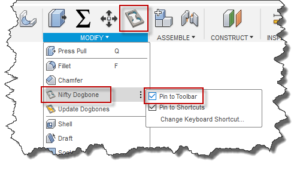
Once installed, you should see two new commands in the MODIFY panel of the MODEL workspace, as shown below. If you click on the three vertical dots to the right of the command, the option to “‘Pin to Toolbar” will appear and, if selected, will display the command in the main toolbar, as shown below.
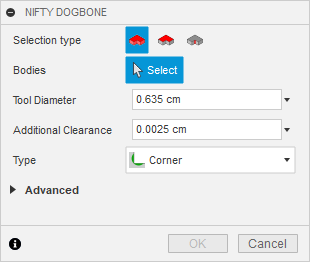
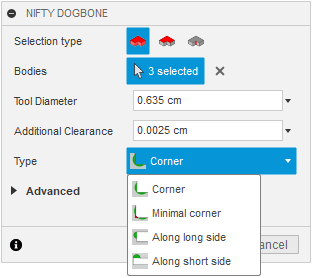
Running the command will display the NIFTY DOGBONE dialog, as shown below. The primary input is the geometry selection, the diameter of the cutting tool, additional clearance, and the type of dogbone to create.
Selection Type
Three selection methods control what you can select and what geometry will have a dogbone added to it. The “Selection type” buttons at the top of the dialog let you choose whether to select bodies, a face, or edges.
Bodies – If you choose the “Body” selection option, you can select entire bodies. The “up” direction for the body is automatically determined, and all edges that are valid for a dogbone will have a dogbone added. As far as geometry, there’s no other input required besides the selection of one or more bodies.
Upper Face – If you choose the “Upper Face” selection option, you can choose any planar face that will be treated as a face on the “upper” side of your model and is used to define the “up” direction for the body as the dogbone edges are automatically determined for that machining direction.
Edges – If You can choose the “Edge” selection option, you can individually select edges on the model to add dogbones. The first edge selected defines the machining orientation, and all other edges added must be in the same orientation.
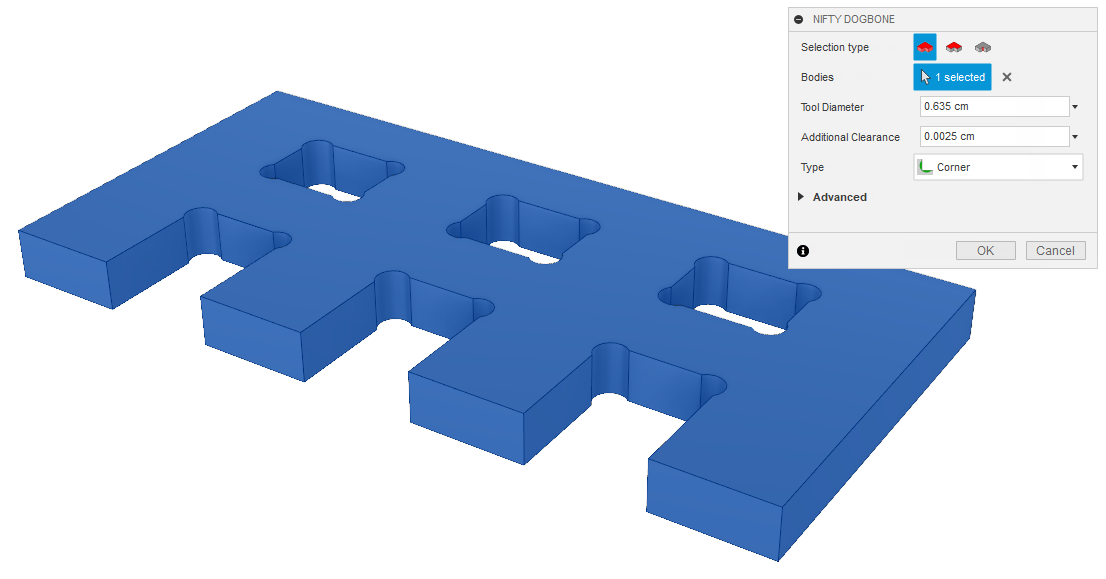
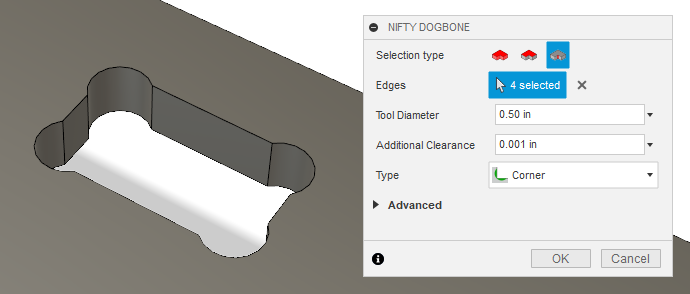
Using any of the selection options, a preview of the dogbones that will be created is shown in the model, as illustrated below.
Tool Diameter
The Tool Diameter setting is the tool diameter you’ll be cutting with.
Additional Clearance
For all dogbone types, add a circular cutout to remove the interfering corner. The diameter of this cutout is the tool diameter plus the additional clearance. Because of the way computers work and potential tolerance issues with the CAM software, it’s best to have some additional clearance in the geometry so when you cut the part; the CAM software will be able to determine that the tool can fit within the dogbone.
Type
The “Type” dropdown lets you choose one of four types of dogbone, described below.
Corner
The “Corner” type of dogbone removes extra material from the corner to completely clear the corner. In the picture below on the left, you can see the dogbone in the corner, and the picture on the right clearly shows the removed extra material. This is done using the same CNC bit used for the rest of the processing, so it doesn’t take much more time to machine and doesn’t require any additional manual work. The downside for some is that they don’t like how it looks because the crescent-shaped wedges might be visible in the finished product.
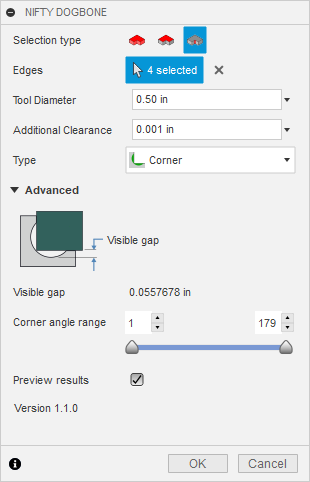
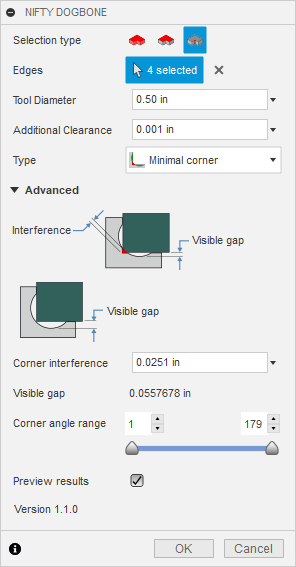
In the “Advanced” group in the dialog, a “Visible gap” field is displayed that displays the size of the visible portion of the dogbone. The value shown is computed for a 90-degree corner. It is a display-only value and can’t be edited, but it will update as you change the tool diameter and additional clearance.
Minimal Corner
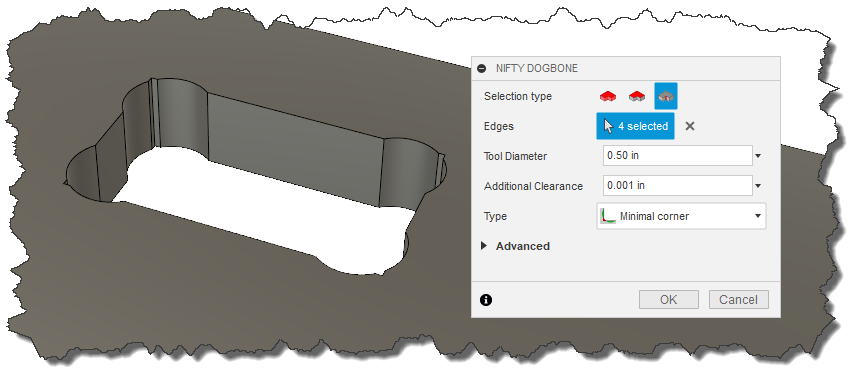
The “Minimal Corner” dogbone is a slight variation of the corner dogbone. This type of dogbone was originally described in a post by FABLAB RUC. You can read more about it on their site. The difference between a minimal and standard corner dogbone is the minimal dogbone doesn’t completely clear out the corner. They found they could leave some material in the corner and force the parts together. The advantage to this is that the visible crescent that’s left is much smaller, and the fact that the parts are forced together provides a tight friction fit. One thing that affects the success of this dogbone style is the material’s density. A soft material will be easier to force into place, whereas a harder material will be more difficult and could damage other areas as you pound the pieces together.
The picture on the left shows the minimal corner dogbone. It looks like the standard corner dogbone until you try to combine the two pieces, as illustrated in the center picture. The corner hits before the part is fully in place. The picture on the right illustrates the amount of interference between the two boards that must be overcome when the parts are assembled.

When the “Minimal Corner” type of dogbone is selected, there is an extra option in the “Advanced” group in the dialog. The “Corner interference” field is displayed and allows you to edit the amount of interference in the corner. The visible gap value will change as you edit the amount of interference. These values are all computed for 90-degree angles.
Along Long/Short Side

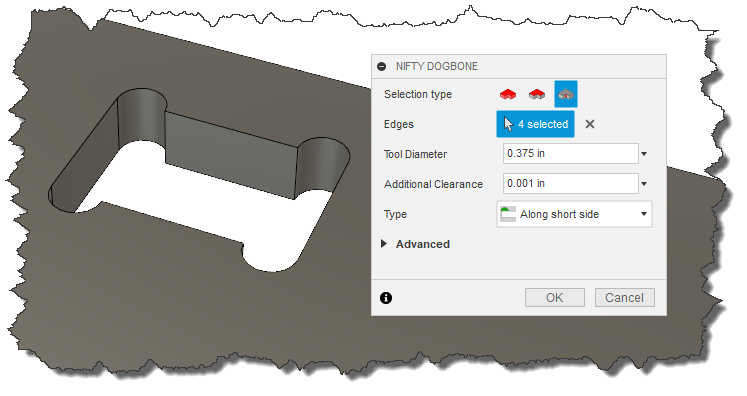
Another style of dogbone is removing material along one side or the dogbone corner. This is illustrated in the picture below. The material can be removed in either direction and completely clears the corner. The result, in this case, leaves more of the cut visible. Some people consider this a decorative element of the finished design.
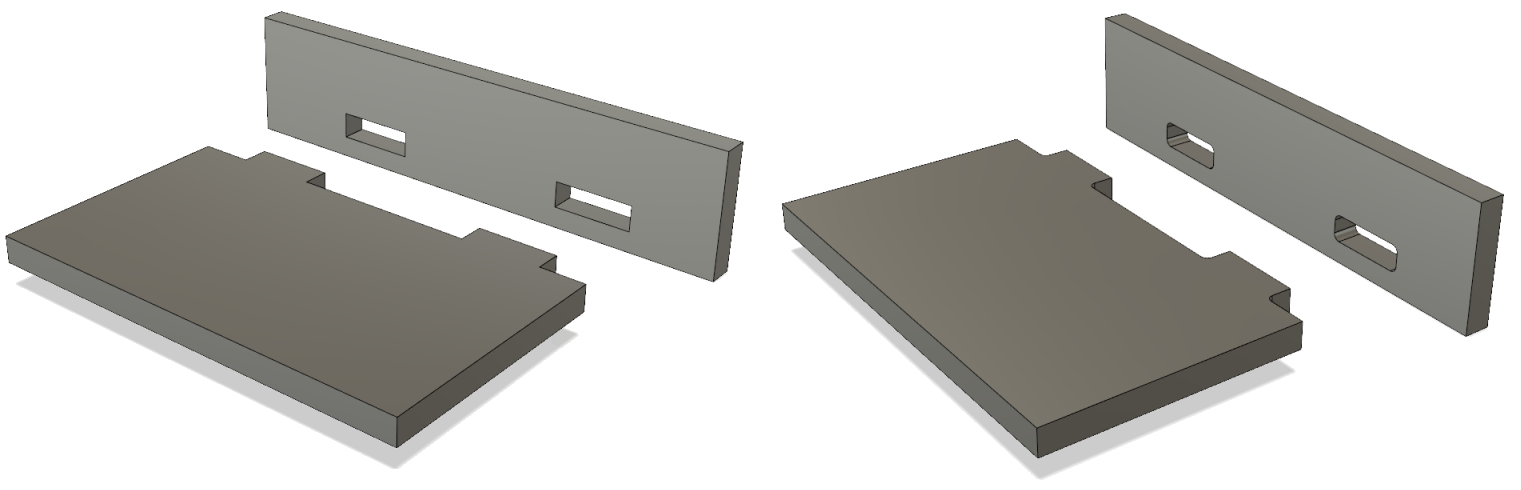
Depending on the design, it’s also possible to completely hide it with this type of dogbone. The picture below illustrates an assembly with slots and tabs to assemble two parts. The picture on the left represents the initial CAD model, and the picture on the right shows the result without any dog bones. There is interference on both pieces, so they won’t fit together.
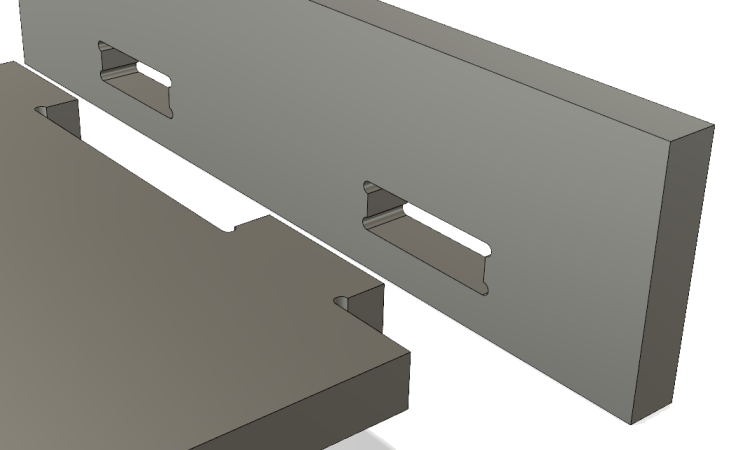
Below are the parts after creating “along an edge” dogbones for both the tabs and the slots.
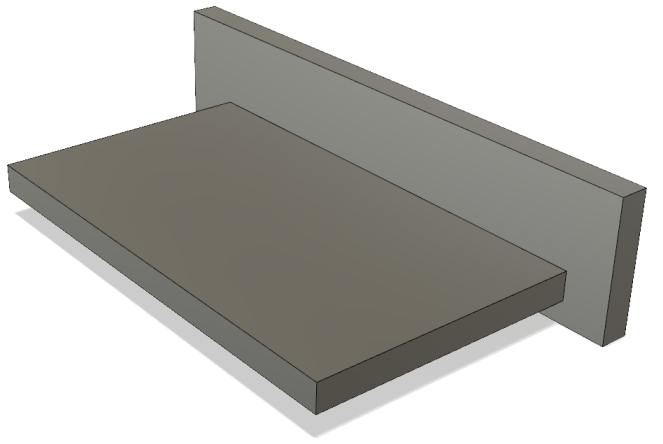
And finally, below is the result after assembling the two parts. In this case, the dogbones are completely hidden by the boards.
Advanced Settings
When you expand the “Advanced” group, some additional information and settings are available. What’s displayed changes depending on the type of dogbone currently selected.
Visible Gap / Corner Interference
These are described above for the Corner and Minimal Corner types.
Corner Angle Range
The Nifty Dogbone add-in automatically finds all of the edges when selecting a body, and when selecting edges, it limits the selection to valid edges. One of the factors it uses when determining which edges are valid is the angle between the faces that the edge connects. The “Corner Angle Range” slider lets you specify the valid angle range.
Preview Results
This setting controls whether the model is modified to show a preview of the dogbones that will be created. Because it’s typically fast to generate the preview, it’s usually nice to have this enabled because it’s very useful to see the preview to verify that the edges you want a dogbone are being included. It also helps to validate that the current size and type of dogbone is what you want.
There are two cases where turning this off can be useful. The first is if you have a body with many edges that are valid for dog bones. This will improve the performance when selecting bodies or edges, but in most cases, the performance isn’t a problem, and having the preview is worthwhile.
The second is when creating corner dogbones and selecting individual edges. When you select an edge and the dogbone preview is created, that edge is consumed and no longer available. This isn’t true for the other types of dog bones. If, for some reason, you picked the wrong edge and need to unselect it, you can turn off the preview, which will make all of the edges that are currently selected available to be de-selected. You can toggle the “Preview results” setting on and off as needed for this purpose.
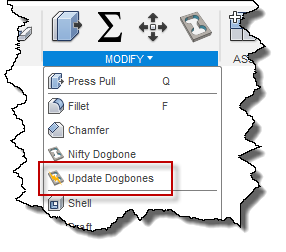
Update Dogbones
The second command added by the Nifty Dogbones add-in is the “Update Dogbones” command. This will recompute and recreate all existing dogbones.
If you’ve added dogbones to a model and then need to change the model geometry, the dogbones may no longer be correct, depending on your changes. Because of limitations with the Fusion 360 programming interface, it’s not currently possible to automatically update them as standard Fusion 360 features do. To work around that, the Nifty Dogbones add-in provides a semi-automatic way to update them. If any dogbones are incorrect, just run the “Update Dogbones” command, and they will all recompute. If any bodies were selected, any new valid edges on the body will also have dogbones added.
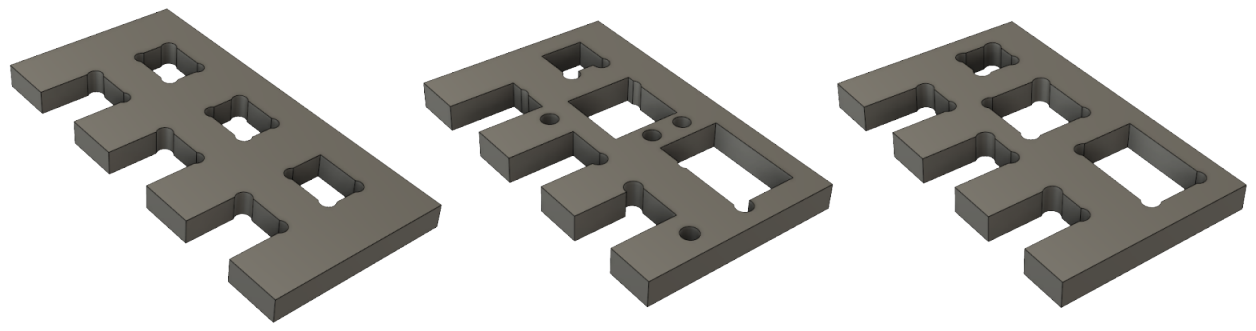
Here’s an example to illustrate what the update command does. The picture on the left is the original model. The one in the center is the model after making some modeling changes. None of the dogbone features are correct. The picture on the right shows the model after running the “Update Dogbones” command.
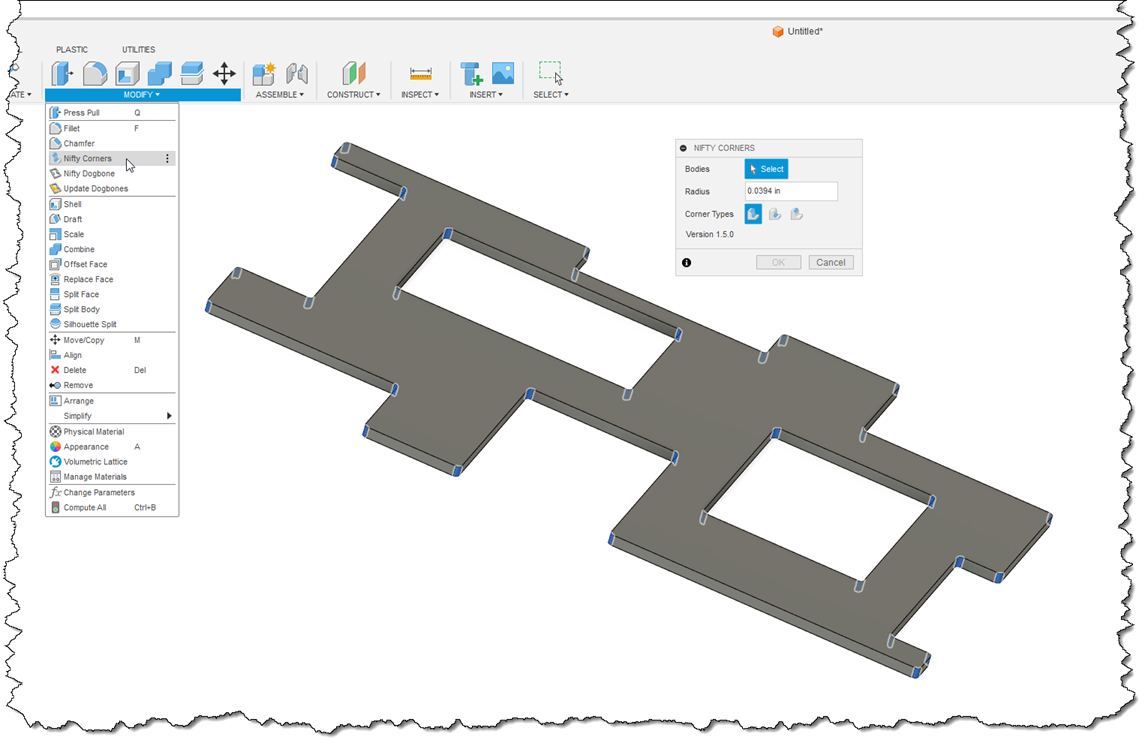
Nifty Corners
The Nifty Corners command is an additional command provided with the Nifty Dogbone app that automates the selection of corners on sheet stock and adds a fillet feature. The Nifty Corners command is located next to the Nifty Dogbone command in the Modify Panel drop-down, as shown below. When running, you enter a desired radius and select one or more bodies. It will automatically determine the machining direction and create a fillet on all of the edges that are in the machining direction. The result is a regular fillet feature that can be edited like any other fillet feature.
Version Info
1.7.1
- Support for the January 2026 Fusion release. Fusion updated the version of Python it uses, and an update was needed to support it.
- Was able to successfully sign the Mac installer, so there shouldn’t be any security issues when downloading and installing.
1.6.3
- Fixes a problem caused by the January 27th release of Fusion. The problem would cause Nifty Dogbone not to be seen by Fusion.
1.6.2
- Fix for a problem with the “Update Dogbones” command. If dogbones had been created and then the Fusion “Create Components from Bodies” command was used to convert the body with dogbones into a component, updating the dogbones would fail. This should now be fixed.
- A zip file is now available to support manual installation in the case of a problem with the installer.
1.6.1
- Support for the September 2024 version of Fusion, which has a new version of Python.
- The workaround to use Nifty Dogbone with Manufacturing Models has been removed since Fusion has fixed the underlying problem, and the workaround is no longer needed.
- The selection of geometry has a different behavior that improves the performance and hopefully reduces confusion in some cases. Previously, while you were selecting geometry, it did a complete check of the selected body to see if there were valid edges for dogbones. If none were found, the body wasn’t selectable. Sometimes, this was confusing because it wasn’t always obvious why the body couldn’t be selected. The complete check is also expensive, so it could be very slow to respond for big models or when using a window select.
Now, all bodies are selectable, and once selected, they are analyzed to see if they can support any dogbones. If they can’t, they are removed from the selection, and a message is displayed notifying you that an invalid body was removed from the selection. - Some of the licensing code was modified, hopefully making them more reliable in the future.
1.5.2
- Fixed a problem with the “Nifty Corners” command where all edges were filleted regardless of the “Corner Types” setting.
- With the “Nifty Corners” command, Fusion will fail to create the fillets if the radius is too large. This generated a generic error, so it wasn’t clear why it failed. It now catches that specific error, shows a message explaining why it failed, and suggests you use a smaller radius.
1.5.1
- Fixed a problem with the “Nifty Corners” command, where the edges of holes were also being filleted.
- Moved the “Nifty Corners” command below the “Nifty Dogbone” and “Update Dogbones” commands.
1.5
- Support for the September 2023 release of Fusion 360.
- Added a new “Nifty Corners” command that automatically selects edges on models produced from sheet stock and creates a fillet feature. See the description above.
- Fixed a problem where only a single edge could be selected in Edge selection mode.
- There’s a known problem when using “Nifty Dogbone” in a Manufacturing Model where the toolbar goes blank. So far, no fix has been identified, but a simple workaround exists. A message is now displayed giving instructions on how to work around the problem.
1.4.3
- Support for the March 2022 release of Fusion 360.
- Fix for a selection problem in cases with specific geometry shapes in the model; selecting the model would result in an error.
1.4.1
- Several fixes have been made to address failures in calculating dogbones.
- Previously, you could select bodies and faces even though they didn’t have valid edges for dogbones. In this case, processing would fail, and a message would appear notifying you that you selected geometry that is not valid for dogbones. A change has been made, so invalid geometry is no longer selectable. This behavior is especially useful when selecting multiple bodies using a window select. Previously, it would fail to calculate any dogbones and display the warning message. Now, it only selects the bodies for which it can create the dogbones.
- The Nifty Dogbone commands are now available in the menu when a manufacturing model is active. In the MANUFACTURE workspace, you can create a Manufacturing Model using the Create Manufacturing Model command, which is available in the SETUP panel. This command creates a parametric copy of the design that you can modify using design features, and these design changes only apply to the manufacturing model.
1.3.0
- Fixed a problem where an error would appear when right-clicking on a Setup in the Manufacturing workspace.
- Fixed a problem where the small icon in the “Update Dogbones” command was too large.
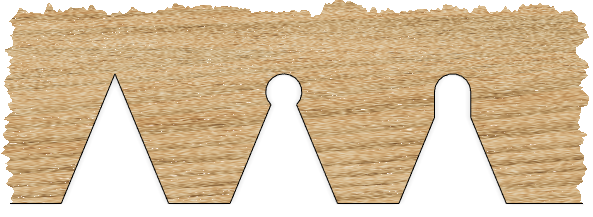
- Enhanced how dogbones are calculated for acute angles. The cutout on the left shows the corner without a dogbone. The cutout in the middle shows the dogbone that was created with the previous version of Nifty Dogbone. It created geometry that was unreachable. The cutout on the right shows the resulting dogbone with this version of Nifty Dogbone. Additional material is removed to make the corner accessible by the tool.
1.2.3
- Fixed a problem where some edges were not being processed.
- Fixed a problem where, when registering a new license key, it was incorrectly reporting that the license key had already been used.
1.2.2
- Fixed a problem where the face angle along an edge was not being compared correctly. It now uses a tolerance in the comparison.
1.2.1
- Fixed a licensing bug.
1.2.0
- Update to support the September 2019 Fusion 360 release.
- Added support not to include corners where the faces are too close for the tool to fit.
1.1.3
- Initial release.
JacoN (verified owner) –
Love it, great time saver. Delivers what was promised.
Alisa Paxton (verified owner) –
Great product and huge time saver. Has allowed me to be more creative in my designs. Long gone are the days of chiseling out rounded corners!
Mark Frazier (verified owner) –
Awesome plugin. Easier to install than the old one I had (can’t remember the origin of it). Request: would it be possible to put a plugin on the CAM side where you just specified the edges during the contour operation and it added the dogbones into the tool path?
zaror1992 (verified owner) –
Great product indeed, just wish it would self update when needed or have a button to update the features.
Justin Eltoft (verified owner) –
Amazing, so easy, great video info, just perfect and what I was looking for and more
Michael Booth (verified owner) –
What a prefect solution for cabinet joints!
Michael Woodrum (verified owner) –
Love the plugin. Very very helpful. However, I am getting an error every time I start fusion saying that the current plguin will not work in the next months after some update occurs. I am on the latest 1.4.3 and I am anxious about losing this valuable tool. Any plans on updating to support the plugin?
Brian Ekins (verified owner) –
The updated version is available now here on my website and it should be available soon on the Autodesk App Store.