A few weeks ago I started a new add-in and ran into a couple of problems. The issue is that I’m using Visual Studio 2017 and Inventor 2019.
Missing Add-In Template
The first problem is that when you install the Developer Tools that are part of the Inventor SDK, it checks to see which version(s) of Visual Studio you have installed and then installs the add-in templates in the correct folders for Visual Studio to find them. The problem is that the Developer Tools install that comes with Inventor 2019 doesn’t install add-in templates for Visual Studio 2017.
There are three ways to work around this problem.
- The first is to get the add-in template file for another version of Visual Studio and copy it into the Visual Studio 2017 template folder.
Documents\Visual Studio 2017\Templates\ProjectTemplates\Visual Basic
- The second is to copy an existing add-in, rename it, and use it as the starting point of your new add-in.
- The third is to not use the add-in templates at all and create a standard “Windows Desktop Class Library” project and add what’s needed to turn it into an Inventor add-in. This isn’t fully documented anywhere but by using an existing add-in as an example and the instructions about how to convert a registry dependent add-in to be registry free should provide the information needed.
- There’s a fourth future solution and that’s to wait for Inventor to officially support Visual Studio 2017, or for someone else to provide the templates. This is something I’ll be doing soon in support of an Inventor Add-In class I’ll be teaching at Autodesk University this year. So watch for those templates to become available.
Missing vsvars32
Once you have an add-in, the next step is to compile it. This was failing for me. Actually, the compile step completes but the post-build step was failing. For a registry-free add-in to work, it needs to have information embedded in the DLL that Windows uses to load it without the information being in the registry. The post-build steps defined in the add-in template call a .NET utility (mt.exe) to embed a manifest file into the add-in’s DLL. The post-build step looks something like this:
call "%VS120COMNTOOLS%vsvars32"
mt.exe -manifest "$(ProjectDir)MyAddIn.X.manifest" -outputresource:"$(TargetPath)";#2
The first line calls “vsvars32” to set up the environment so paths to .NET utilities are available. Because of this, it is able to find mt.exe in the next line. However, with Visual Studio 2017, a newer version of the .NET Framework is installed and the 120 Common Tools referenced is no longer valid. With Visual Studio 2017 (which is version 15) it should now be VS150COMNTOOLS. In previous versions of Visual Studio, the environment variable for VS120COMNTOOLS was automatically added to the system as part of the installation of Visual Studio. After a bit of searching, I found that with Visual Studio 2017 this is no longer done because Visual Studio now supports Side-By-Side install and doesn’t make any global system changes. Here are a couple of the posts that were helpful.
https://github.com/Microsoft/visualfsharp/issues/1761
https://stackoverflow.com/questions/42996506/vs2017-command-line-build-missing-vs150comntoolsvsvars32-bat
To quickly work around the missing VS150COMNTOOLS, I manually added the environment variable, but it was still failing and then I found out that the vsvars32.bat utility is no longer provided. A substitute that will work in this case is VsDevCmd.bat. So the post-build steps become:
call "%VS150COMNTOOLS%VsDevCmd"
mt.exe -manifest "$(ProjectDir)MyAddIn.X.manifest" -outputresource:"$(TargetPath)";#2
Defining VS150COMNTOOLS
Finally, to follow the spirit of the new Side-By-Side install capabilities of Visual Studio, it’s best not to add the environment variable but instead to use the “Developer Command Prompt for VS 2017”, as shown below. You will probably want to add this to your Favorites list in the Start menu to make it easier to get to.
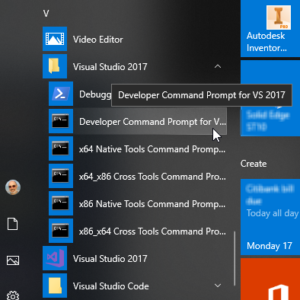
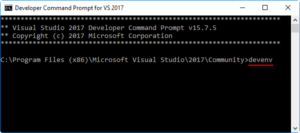
Running the “Developer Command Prompt” will open a command prompt window like the one shown below. As part of opening this window, the standard variables have been set up, including VS150COMNTOOLS. You can start Visual Studio from here and then everything will work as expected. You start Visual Studio by executing devenv, as shown below.
Hopefully, this information gets you quickly past these issues and onto developing your add-in.
Update: After working with this for a bit I’m having second thoughts about the suggestion of starting Visual Studio from the “Developer Command Prompt”. I frequently browse and open projects form Explorer and they don’t get the correct paths defined because Visual Studio isn’t being opened in the correct environment. So I’ve gone ahead and added an environment variable. I moved to Windows 10 fairly recently so if you’re in the same boat, here are the steps I followed to add the environment variable.
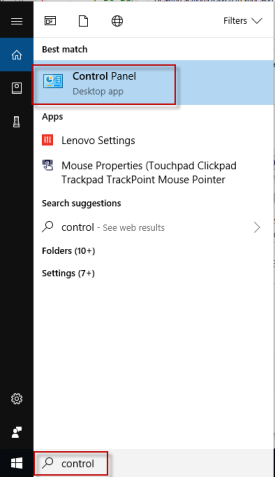
- Open Control Panel. Since the Start menu isn’t the same as in Windows 7 it took me a bit to find it. The easiest way is to just search for it, like shown below, where I searched for “control”.
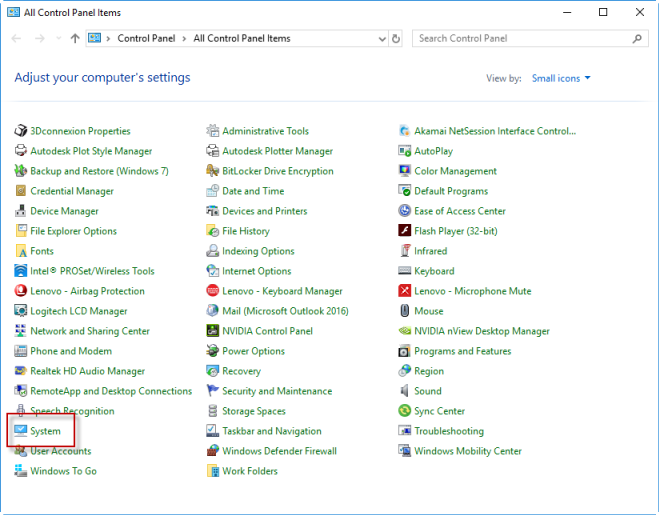
- When the Control Panel dialog appears, double-click on “System”, as shown below.
- In the “System” dialog, select “Advanced system settings”, as shown below.

- You’re getting close now. In the System Properties dialog, click the “Environment Variables…” button, as shown below.
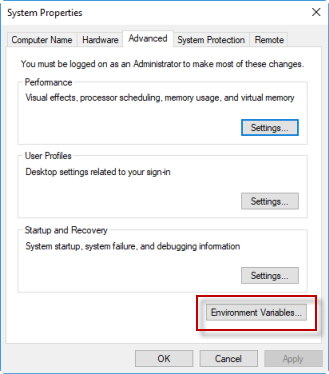
- Below is the Environment Variables dialog with my added environment variable. To add a new environment variable, click the “New…” button. Either a user or system environment variable will work. I added mine as a user environment variable.

The dialog to add a new variable looks like the dialog below. Type in the name and the value and click OK and you should now be up and running.

Here is the name and value as text so you can copy and paste. I’m using Visual Studio Community, so you’ll need to verify the location on your system in case you’re using another type of Visual Studio.
Name: VS150COMNTOOLS
Value: C:\Program Files (x86)\Microsoft Visual Studio\2017\Community\Common7\Tools

9 thoughts on “Inventor Add-Ins in Visual Studio 2017”
“There’s a fourth future solution and that’s to wait for Inventor to officially support Visual Studio 2017, or for someone else to provide the templates. This is something I’ll be doing soon in support of an Inventor Add-In class I’ll be teaching at Autodesk University this year. So watch for those templates to become available.”
Any updates on the template?
Greetings Martin Borst
Yes, there is an update. I created a template, along with some documentation on creating add-ins. You can get it here: https://ekinssolutions.com/nifty_addin_template/
Hello, Brian!
I installed Visual Studio 2019 RC and I couldn’t implement a manifest…
Thanks for your article! You helped solve the problem.
I just wrote this line:
call “%vsappiddir%..\tools\vsdevcmd.bat”
mt.exe -manifest “$(ProjectDir)MyAddin.X.manifest” -outputresource:”$(TargetPath)”;#2
There is another problem. You need to install the “SDK for Windows 10” component. Without this component mt.exe will not work.
Hello Brian,
I’m using Visual Studio 2019, I followed your instructions and it works very well. Thanks a lot!
Patrick
I’m using Visual Studio Community 2017. After making any changes in my Vb.net code I get the window “There were build errors. Would you like to continue and run the last successful build?”.
I recently had to reinstall VS2017 and this has been happenning ever since. I’m working with .dll files, and those are the same I was using before reinstalling and they worked just fine. So I know that those are fine.
The error that i’m getting in the error list is the following:
The command call “%VS110COMNTOOLS%vsvars32” mt.exe – manifest “C:\Work\X_AddIn\X_AddIn\X_AddIn\X_AddIn.X.manifest” -outputresource: “C:\ProgramData\Autodesk\Inventor2019\Addins\X AddIn\X_AddIn.dll”;#2 exited with code 1.
I have traverse through the folders searching for the mt.exe file but it’s not there.
Any ideas where i could find it?
Thanks in advance for the help.
Hi all,
I was working with Visual Studio Community 2017 and Inventor Professional 2019 and my vb.net code was working just fine. Then I had to reformat my computer and reinstall everything. From that moment on I keep getting the following error for which i can’t find a solution:
The command “call “%VS110COMNTOOLS%vsvars32” mt.exe – manifest “(ProjectDir)MyAddIn.X.manifest” -outputresource:”(TargetPath)MyAddIn.dll”;#2 exited with code 9009.
If I make any changes in my code (for example commenting something out) and then I run a debug, the error comes up. Then if I debug a second time without making any further changes to the code It will just build it. This happens everytime a change in the code is made.
I tried the steps mentioned in blog but it doesn’t do it for me. I remembered that originally i was working with Visual Studio Express 2012 and then i updated to VSC2017, but after reformatting my computer I installed VSC2017 directly. With this in mind as a last resource I though to install VSE2012 again and make the upgrade from there with the hope to get the same files installed in the same directories as before. This didn’t work either for I get the same error in VSE2012.
I think is worth mentioning that i have this problem in two different computers.
I know that the error is comming from the postbuild event. Since i have deleted the complete post build event from the project file and then it builds just fine everytime, but i’m new to programming and I don’t know what consequences it has to do this.
I’ve been stuck with this for about 3 weeks now and I really have no idea how to solve this. I have done a lot of research and I think that this site is my best chance to finding help.
Thank you in advance.
Thanks Brian. This is a super valuable resource! I can’t believe there still isn’t well documented and supported boilerplate and templates for Inventor addins, after all of these years.
Thank you, Brian.
I have VS2019 and Inventor 2017.
solution for me is:
call “%VS160COMNTOOLS%VsDevCmd”
mt.exe -manifest “$(ProjectDir)MyAddin.X.manifest” -outputresource:”$(TargetPath)”;#2